


Recommended Pressure Standards - ALKB9601
Complete Operational Procedures for the Accurate Calibration of Differential Pressure Gauges: Implementation Guidelines for Measurement Standards and Stepwise Testing
This calibration is being conducted to ensure that the measurement data from the differential pressure gauges under test is accurate and reliable, complies with metrological verification standards, and guarantees the accuracy of industrial production, quality control, and measurement and testing in various scenarios. This calibration utilizes the ALKC600WC precision digital differential pressure gauge, the ALKB9601 portable micro-pressure pump, and the ALKA12 differential pressure gauge calibration stand as core tools. Conducted under standardized environmental conditions of (20±2)°C, relative humidity ≤85% RH, and free from condensation and vibration, the process involves comparing the test gauge with a standard gauge to obtain accurate readings. The calibration covered both atmospheric pressure and vacuum modes, employing stepwise pressure adjustment. Errors were recorded based on stable readings obtained after gently tapping the meter housing. The entire process adhered to the principle of “gradual pressure application and stable readings,” providing standard guidelines for the scientific calibration of differential pressure gauges and ensuring that the tested instruments meet metrological requirements.
Differential Pressure Gauge Calibration Tool
|
Name |
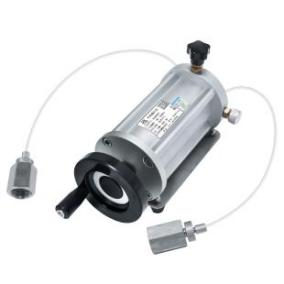
Portable Micro-Pressure Pump |
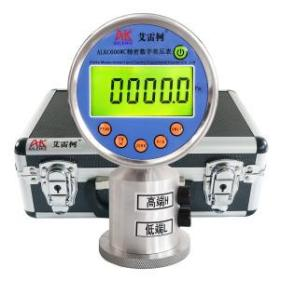
Precision Digital Differential Pressure Gauge |
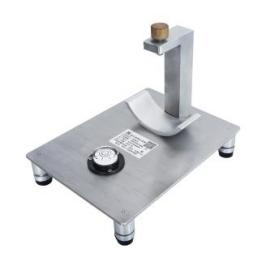
Differential Pressure Gauge Calibration Stand |
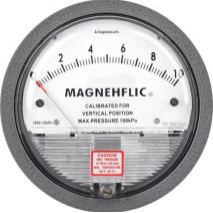
Tested Differential Pressure Gauge |
|
Model |
ALKB9601 |
ALKC600WC |
ALKA12 |
TE2000 (Other Models) |
|
Technical Specifications |
Pressure Application Method: Manual Pressure Range: ±10 kPa Medium: Clean Air Outlets: 2 Connection: M20×1.5 (internal) Hose: 400 mm Guide Hose: 280 mm Guide Fitting: M10×1 to φ6 Net Weight: 1.35 kg Product Dimensions: 200×100×115 mm |
Pressure: ±10 kPa Accuracy: Class 0.05 Temperature compensation: With temperature compensation Power supply: Built-in rechargeable battery Connection: M10×1 Net weight: 0.95 kg Product dimensions: 110 × 75 × 190 mm |
With built-in level Material: Stainless steel Net weight: 2.95 kg Dimensions: 190 × 250 × 210 mm |
Accuracy: Class 2.5 Medium: Clean air Process connections: Both high-pressure and low-pressure ports are 1/8" tapered pipe threads Net weight: 0.56 kg Dimensions: Φ120 × 55 mm |
|
Product Dimensions |
|
|
|
|
The entire verification process must strictly comply with current metrological technical specifications. The primary reference is JJG 52-2013, “General Pressure Gauges, Pressure-Vacuum Gauges, and Vacuum Gauges with Elastic Elements,” which applies to the initial verification, periodic verification, and in-service inspection of general pressure gauges, pressure-vacuum gauges, and vacuum gauges with elastic elements, covering on-site indicating pressure measurement instruments commonly used in industry.
Detailed Operating Procedures
Preliminary Preparations
1. Environmental Requirements
Maintain a temperature of (20±2)°C, relative humidity ≤85% RH, and ensure there is no condensation. The site must be free of vibration, dust, and corrosive gases.
2. Connecting Tools
• First, place the ALKA12 differential pressure gauge calibration stand on a level surface. Position the gauge under test within the curved base, ensuring it is level. Tighten the knob at the top to stabilize the vertical and horizontal alignment of the instrument.
• Connect the high-pressure port (H port) of the ALKC600WC precision digital differential pressure gauge to the outlet of the ALKB9601 portable micro-pressure pump, then connect the high-pressure port of the gauge under test to the other outlet of the ALKB9601 portable micro-pressure pump.
Differential Pressure Gauge Calibration Process
1. Pressurization Process
• First, turn the fine-adjustment handle counterclockwise until it stops. Then, turn the micro-adjustment knob counterclockwise to the appropriate position, and close the pressure relief valve.
• Use the fine-tuning handle to slowly increase the pressure by turning it clockwise until the pressure reaches approximately the calibration value. Then, use the micro-adjustment knob to slowly adjust to the calibration point of 2500 Pa. Once the pressure has stabilized and the standard reading no longer fluctuates, check the pressure reading on the differential pressure gauge under test. Next, gently tap the side of the gauge’s housing with your finger (never tap the glass or strike it forcefully), observe the pointer position, and record the reading after the tap has stabilized. Use the reading after tapping as the actual calibration reading for that pressure point, and calculate the error.
• Repeat the same procedure to adjust to the calibration points of 5000 Pa, 7500 Pa, and 10000 Pa. Check the pressure reading on the differential pressure gauge under test, tap the gauge, and record the reading after it stabilizes.
2. Depressurization Process
• Use the fine-adjustment knob to rotate counterclockwise to reduce pressure until it is approximately at the calibration value, then use the fine-adjustment knob to slowly adjust to the 7500 Pa calibration point. Once the pressure stabilizes, tap the differential pressure gauge under test and record the value.
• Repeat the same procedure to adjust to the calibration points of 5000 Pa and 2500 Pa. Check the pressure reading on the differential pressure gauge under test, tap the gauge, and record the reading once it stabilizes.
3. Depressurization Process
Open the relief valve to gradually release the pressure in the pipeline. Depressurize to 0 Pa to complete the measurement.
Vacuum Calibration Process for Differential Pressure Gauges
1. Pressurization Process
• First, turn the fine-adjustment handle clockwise until it stops, then turn the micro-adjustment knob clockwise to the appropriate position, and close the pressure relief valve.
• Use the fine-adjustment handle to slowly turn counterclockwise until the pressure is approximately at the calibration value, then use the micro-adjustment knob to slowly adjust to the calibration point of -2500 Pa. Once the pressure stabilizes, tap the differential pressure gauge under test and record the reading.
• Repeat the same procedure to adjust to the calibration points of -5000 Pa, -7500 Pa, and -10000 Pa. Observe the pressure reading on the differential pressure gauge under test, tap the gauge, and record the reading once it stabilizes after the tap.
2. Depressurization Process
• Use the fine-adjustment handle to rotate clockwise to reduce pressure until it reaches approximately the calibration value. Then, use the fine-adjustment knob to slowly adjust to the calibration point of -7500 Pa. Once the pressure stabilizes, tap the differential pressure gauge under test and record the reading.
• Repeat the same procedure to adjust to the calibration points of -5000 Pa and -2500 Pa. Observe the pressure reading on the differential pressure gauge under test, tap the gauge, and record the reading once it stabilizes.
3. Depressurization Process
Open the relief valve to gradually release the pressure in the pipeline. Once the pressure reaches 0, the measurement is complete.
Precautions
Proper Use
• During calibration, ensure that the tolerance of the standard gauge is less than that of the gauge under test to guarantee accurate and reliable results that comply with metrological standards.
• Follow standard operating procedures; when using the ALKB9601 portable micro-pressure pump, apply and release pressure slowly to avoid pressure surges.
• Pressurize to the calibration point and record the reading once the reference gauge’s value has stabilized; for the differential pressure gauge under test, gently tap the case after the pressure has stabilized, and use the reading immediately after tapping as the final value to ensure accurate recording.
• Upon completion of the test, slowly depressurize to zero and ensure there is no residual pressure before removing the instrument under test.
Maintenance and Calibration Schedule
• Perform metrological verification on the ALKC600WC precision digital differential pressure gauge regularly (recommended once a year) to ensure measurement accuracy meets standards.
• When the pressure gauge is not in use, turn off the power; if not used for an extended period, recharge it once every three months.
• When the micro-pressure pump is not in use for an extended period, depressurize it before storage and cover it with a cloth cover to prevent dust from entering the instrument.
Conclusion
This differential pressure gauge calibration strictly adhered to metrological verification standards. Using the precision digital differential pressure gauge, portable micro-pressure pump, and calibration stand as core tools, we completed the full-process testing of the step-type differential pressure gauge under both air pressure and vacuum modes. Errors at each calibration point were precisely calculated to ensure the accuracy of the tested differential pressure gauges and their compliance with metrological requirements. Moving forward, we will implement regular calibration and standardized operating procedures to ensure measurement accuracy across various scenarios, mitigate the risk of instrument deviation, and provide robust metrological support for industrial production and quality control.
Related News
: Metrological Calibration and Standardisation Procedures for the 0–100 MPa High-Pressure Range")


")